Monthly Archives: January 2013

History of Flowerhorn

The History of the Flowerhorn Cichlid

The Flowerhorn Cichlid is a result of hybrid between different South American cichlids. The Flowerhorn was developed in Malaysia during 1990s, and exactly which South American Cichlids that was used and in which combinations is still a secret. This secrecy has of caused a lot of speculation and a number of more or less reasonable theories have been put forth. One of the more unlikely theories suggests that the Flowerhorn Cichlid was artificially created in a Malaysian genetics laboratory by combining genes from a Goldfish with genes from the Trimac Cichlid (Amhilophous Trimaculatus). This theory does garner a little credibility as the Trimac Cichlid has the same basic shape of a Flowerhorn (albeit the hump is much smaller and is very colorful.  A more reasonable suggestion is that the Flowerhorn Cichlid is the result of crossing many different types of South American cichlids with each other, and that different forms of Flowerhorn Cichlids can steam from different South American Cichlids. The most likely ancestry is a crossing between the Trimac cichlid and other South American cichlids such as Midas Cichlid (Amphilophus Citrinellum), Red Devil Cichlid (Amphilophus Labiatum) and Redheaded Cichlid (Vieja Synspila).  This theory we believe here at Somethingsphishy.com is correct.

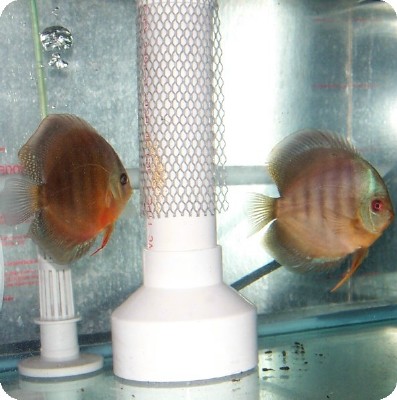
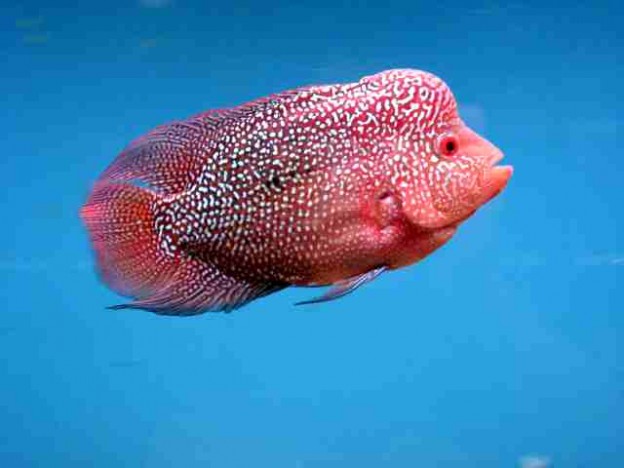
The look of the Flowerhorn Cichlids available in fish stores today is however not just the result of selective breeding. You can affect the appearance of a Flowerhorn Cichlid by adjusting environmental factors such as the water chemistry in the aquarium. The food you feed your Flowerhorn Cichlid can also change its look. The single most important factor behind the look of the fish is however the genetic makeup formed by selective breeding.  Only males develop the signature Hump.  Flowerhorn respond to color enhancing food dramatically and we recommend you use it with them.

The Flowerhorn has been criticized as an unnatural and dangerous hybrid, produced by money-hungry breeders just to make money. Others have been impressed by the hard work that is evidently behind the creation of the Flowerhorn Cichlid. A lot of the South American Cichlids mentioned above will occasionally interbreed in the wild as well, but there is no doubt that the Flowerhorn Cichlid has been deliberately produced by breeders. The Flowerhorn Cichlids are not the result of random cross breeding. Some people view the Flowerhorn as a purely man-made creation while others compare the hybrid to all the other animal variants that have been refined by humans during centuries of selective breeding such as breeds of dogs and cats.

Instructions to Artificially Raising Discus Fish Fry

This article describes in detail how to artificially raise Discus Fish.  

Step 1:
Give the parents a 2 inch PVC pipe 14-16″ long to let them spawn on. You can attached it to a 4 inch converter to give it a base.  pH must be below 7 with 6.5  being ideal and water used throughout this process must be soft (around 200 ppm TDS). 

Step 2:
Make sure that the males is fertilizing the eggs, otherwise any attempt is futile.  You will see making a breeding run after the female lays eggs.

Step 3:
Wait four hours after spawning is finished. This gives the eggs time to fully fertilize.

Step 4:
Using a 2 gallon glass beaker, fill it with the tank water the parents (& eggs) are in. Put the PVC in the jar (quickly and calmly).  Then put the beaker into a 5-10 gallon tank.  So you will have the eggs inside a beaker which is inside a 5-10 gallon tank.

Step 5:
Then quickly remove the PCV pie and put it into the beaker filled with water at 84f (50w heater is required). Also put a small Sponge Filter in the tank and turn it on. This will keep the jar warm and allow the tank to cycle. 

Step 6:
Turn the air flow in the Sponge Filter on so that there is a good current in the tank (don’t blast the eggs though).  The current will help keep the eggs from growing fungus.

Step 7:
Add three to six drops of methylene blue. Other people may recommend more, but I believe that it may cause fry loss. Six or less drops works well and allows you to observe the eggs.

Step 8:
They will begin hatching (if they are fertile and the correct water parameters/hardness/uS are present) in two days.

Step 9:
They will start free swimming in three to four days . They will be clogged in a bunch on the bottom of the tub during this period and will untangle when ready.

Step 10:
As soon as they become free swimming, give them their first feeding. Use artificial plankton and rotifers (a.p.r.) used for feeding marine filter feeders. Add an amount the size of the winding screw on your watch.

Step 11:
4 hrs later remove the jar from the 5g tank and float a small Rubbermaid tub in the 5g tank. Place the airstone in the tub (turn it off first). Use a baster to move the fry to the little tub. Fill the tub with the jar water 75% and 5g tank 25% until the tub is almost full. Turn the airstone on to a small blip…blip..blip….. enough to keep the surface of the water in the tub broken. Keep the tank with the tub covered to avoid cooling/evap/drafting on the tub.

Step 12:
Add the same small amount of food.

Step 13:
4 hrs. later do a fifty percent water change of tub water using the baster. I go from the baster to another small tub before I dump the water in case I suck up some fry (so I don’t dump them out). Replace the tub water with the tank water (Hey, notice the tank water is the same temp as the tub water!). Feed same small amount.

Step 14:
4-6 hrs later do a 90% change using the above method. (NOTE: eventually the 5g starts to get low. NEVER (REPEAT VERY LOUDLY, NEVER EVER) fill the 5g until the tub water has been changed and refilled. If you do fill the 5g tank prior to filling the tub, the temp may not be exactly the same and when you fill the tub afterwards you might watch the babies go into shock…they WILL NOT recover! (This cost me A LOT of fry to figure this out!).

Step 15:
Repeat 90% water change and feeding every 4-6 hrs. (8 at the most so you can sleep, I’ve gone 10 before, but don’t recommend it unless the is nothing you can do about it).

Step 16:
On the second day of free swimming, add a tiny amount (VERY TINY) amount of NEWLY HATCHED baby brine shrimp (b.b.s.) with every feeding. Don’t stop using the a.p.r. at this point. Continue performing step 15. a.p.r. shows grey bellies, b.b.s. shows pink bellies.

Step 17:
Continue feeding a.p.r. and b.b.s. for one week. All bellies should show pink by end of week.

Step 18:
Once all bellies show pink discontinue the a.p.r. and continue the b.b.s. Keep performing step 15.

Step 19:
One week later you should have lots of fry the size of baby Discus. Let them go into the 5g tank and feed them there from now on. Keep the tank clean and watch the water changing temp. A once a day water change is good enough. The rest is standard baby fish stuff!